Bestemors Eplekake (Grandma’s Apple Cake)

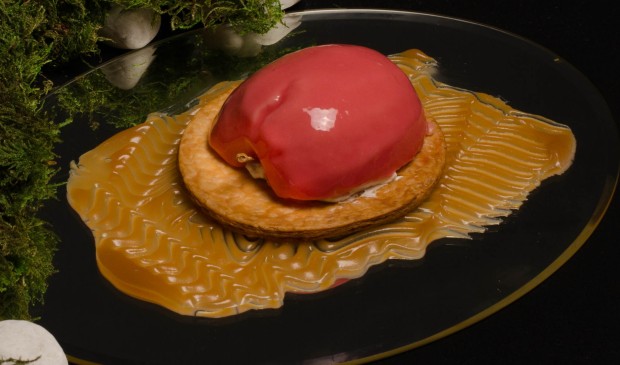
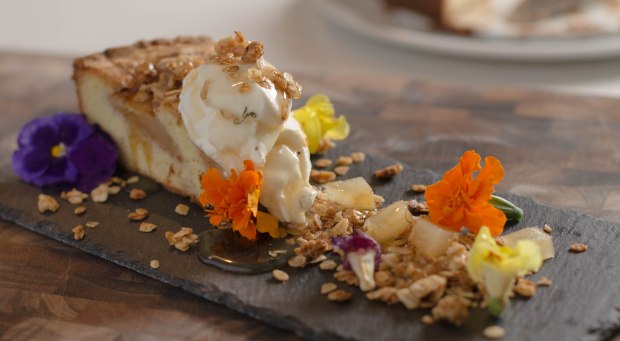
This post is all about feelings. My grandma, with whom I was close, would always make this for any festive occasion. And when I moved to Seattle she would always have a fresh baked cake ready for when I arrived. This recipe is for me to document her recipe so I don’t lose it. So I guess you are getting to see the family secrets. But true to everything I do I like to make my spin on it. The cake is my grandma’s recipe, but the rest is how I feel this should be served as a high class dessert. So I served it with warm Granola, Compressed Apples, Whipped Cream, and Baked Apple Hard Cider and Dill Syrup.

BestemorsEpleKake-00378

Apple Cake

150g Butter (salted is fine)
250g Sugar
120g egg (3 eggs)
210g Cake Flour
2g Baking Powder
For topping:
4 Apples (Tart and crisp)
10g Sugar
5g Cinnamon

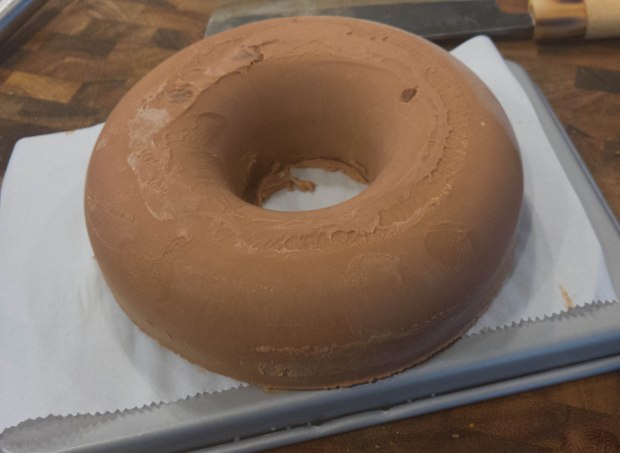
Pre-heat your oven to 175c (350f). Start by creaming your butter and sugar in stand mixer (any type of mixer works). Slowly add your eggs in 1/3 or 1 at the time.  Sift all the dry together and add to your batter. It is important to mix well, but not over-mix. Grease your cake tin with butter and add your batter to the tin. Peel and cut each appls in to 6 wedges. Before putting them on top of the cake, toss them in the Sugar and Cinnamon mixture. If you can get real Cinnamon it will make a pleasant addition to the cake. Gently press the Apple wedges into the batter in a circular pattern. Making sure they are evenly distributed. Sprinkle the leftover cinnamon sugar mixture over the top. Bake for 45 minutes. Check it at 40 minutes and adjust if needed.

BestemorsEpleKake-00376

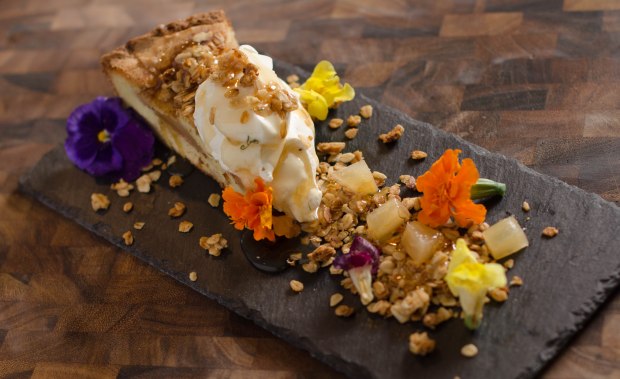
For assembly, I warmed up some Oats with a little honey to make the granola, with a little sprinkling of salt and vanilla. Compressed the Apples with Calvados. Compressing fruits is when you take pieces of fruit and liquid and pressurize in a chamber vacuum sealer. Whipped up some cream with very little sugar. You could optionally omit the sugar from the cream. For the syrup I used a Baked Apple Hard Cider which is made by Washington Cidery, D’s Wicked Cider Company. Reduce that down to a rich syrup (1 part cider to 3 part sugar). Once you get that syrup consistency, remove it from the heat and add the Dill to infuse. Decorate with edible flowers. I used Snap Dragons as those were my favorite flowers from my Grandma’s garden.

See you next time. Hungry Eyes Full Heart, Can’t Lose!

Dim Sum Feast

Second phase of our celebration of our purchase of a Wagyu Beef Shank from Butcher’s Table, Joe and I decided to make a trio of dim sum; Soup Dumplings (Shao Long Bao), Pinch Steam Buns (Gua Bao), and Beef Rolls (Niu Rou Jian Bing).

DimSum-00411

We found the recipes for the soup dumplings and pinch steam buns on Chefsteps, and we followed their recipes for the dough exactly. For the filling for the soup dumplings, we used Wagyy Beef Shank, cooked 80c for 24 hours. To the beef we added garlic, ginger, and green onion. Once cooked we reserved half of the beef for the steam buns and used the rest for soup dumplings. For the dumpling filling, we quickly pulsed the meat with the gelatinous stock in a food processor until it became a smooth paste.

Shank

1kg Wagyu Beef Shank
5g Szechuanese Peppercorn
5g Chili Japones
5g Cinnamon
5g Star Anise
5g Clove
10g Salt

Grind spices together and coat the outside of the shank. Sous vide 65c for 60 hours. Slice thin with a meat slicer.

Pancake

250g All Purpose Flour
170g Water (Boiling)
15g Oil (Neutral Oil)
10g green onion
pinch of salt
2 eggs

Filling

Cucumber
Cilantro
Chinese Sweet Black Bean Paste
Green onion

Mix flour and salt, and bring water to a boil. As soon as it starts to boil, remove it from the heat and pour it into the flour and salt, and combine thoroughly. Allow the dough to rest for 30 minutes.

Roll the dough out into a rectangle about 5mm thick. Brush the dough with all of the oil and then spread the onions over the surface. We are making laminated dough with oil instead of butter. Roll the dough up like a jelly roll, and then cut it into four equal pieces. For each piece, smash it into a ball and then roll it out flat again. Shape it into a rectangle so that your beef roll will come out evenly.

In a small bowl, crack the eggs and beat them to a homogeneous texture.

In a hot pan, add a little bit of oil, and fry each pancake one at a time. Allow it to cook on one side until bubbles start to form in the dough. Once it’s bubbling, pour in quarter of the beaten eggs, and spread it evenly over the top of the pancake, then flip. Do this quickly, being careful not to burn the pancake.

Once the egg is cooked, remove the pancake from the pan, and place it egg side up.

DimSum-00408

Prepare the fillings

Thinly slice cucumber and green onions. Remove the stems from the cilantro.

To assemble, lay out the pancake, and apply a thin layer of sweet bean paste. Spread out the cucumbers, green onion, cilantro, and beef, and then roll it up. Slice into a few pieces, and optionally serve with pickled peppers.

See you next time. Hungry Eyes Full Heart, Can’t Lose!

Ras el Shank

This is the first part of Joe and mine’s celebration of the Wagyu beef shank we bought from The Butcher’s Table in South Lake Union. As befits the name, the butchery was immaculate, and the shank had immense flavor. We decided to pursue a  Moroccan flavor profile with a Ras el Hanout spice mix from World Spice in Pike Place Market. Normally one would use this method with lamb shanks, so this is our twist to it. We served it with a Harissa tomato sauce, Mint Yogurt, Cous Cous, and roasted veggies.

MoroccanShank-00353

Ras el Hanout Shank

Not much of a recipe for this. I used a spice mix from World Spice and rubbed it all over the outside of the 2kg Wagyu beef shank. Sous vide at 80c for 24 hours until the meat is falling off the bone. Finely chop some mint to add to Yogurt. I used a Greek yogurt from Ellenos in Seattle. Roast some zucchini and bell peppers in the oven, and cook cous cous until tender. Add the Bell Peppers to the cous cous.

For the harissa sauce, mix equal parts of freshly ground harissa and olive oil, and heat in a pan while stirring. Once the spices are integrated, stir in some tomato sauce, salt, and water, until you reach a tolerable heat level and a pleasing texture. Top the shank with the sauce

RasElHanoutCocktail-00358

Ras el Hanout Cocktail

For the cocktail, we kept it very simple, choosing to highlight the flavors of the Ras el Hanout. With fresh whole spices, the key is to mobilize the perfume with some kind of effervescence. The goal here is bring the spices to the front, so any complex spirits would be a distraction. For that reason, the drink is composed of vodka, lemon juice, simple syrup, fresh spices, and carbonated water. Despite the seemingly basic highball format, the drink develops a rich complexity of exotic flavors.

MoroccanShank-00345

See you next time. Hungry Eyes Full Heart, Can’t Lose!

Enchanted Valentine: Beauty and the Beast

Who told you that you might gather my roses? Was it not enough that I allowed you to be in my palace and was kind to you? This is how you show your gratitude, by stealing my flowers? But your insolence shall not go unpunished!

beautyandbeast-00226

For the longest time I have been wanting to serve a cocktail under a cloche. One of my favorite drinks is the Jack Rose, a Calvados cocktail that gets a rosy color from grenadine. When I thought of serving a Jack Rose under a cloche, it reminded me of the rose in Beauty and the Beast, and I realized I wanted to create a dish around this theme. Ultimately, we did not end up serving a Jack Rose, but this was the idea that set us on the path towards the Enchanted Valentine’s Dinner.

beautyandbeast-00228

The merchant, terrified by these furious words, dropped the fatal rose, and, throwing himself on his knees, cried: “Pardon me, noble sir. I am truly grateful to you for your hospitality, which was so magnificent that I could not imagine that you would be offended by my taking such a little thing as a rose.

Our final and third course is also a dessert, since you can never go too sweet on Valentine’s day, inspired by Beauty and the Beast by Gabrielle-Suzanne Barbot de Villeneuve. I wanted a dessert to have a rough exterior with a unseen sweet and dreamy interior. So I made a Choux au Craquelin with rose crust and two layers of filling, a smooth pistachio custard and a creamy rose chocolate ganache. Joe at Measure and Stir went with the idea and made a cocktail worthy of being a rose. The rose is from the Disney version of the story, and paired a rose shrub with vanilla infused bourbon,  a drink he calls, Be So Kind as to Bring Me a Rose.

beautyandbeast-00230

The Sweet Heart of the Beast

Craquelin

100g Pastry Flour
100g Butter (Unsalted Soft)
100g Demerara Sugar
2g Dried Rose (Powder)
4 Drops Red Food Color

Choux

150g Water
100g Whole Milk
100g Butter (Unsalted)
3g Salt
3g Sugar
150g Bread Flour
200g Eggs
8 Drops Red Food Color

Start with the Craquelin by combining all the ingredients. Once they have formed a red paste roll the paste out between two pieces of parchment paper. Roll it out to an even 2mm thickness. Place in the freezer to set for 2 hours. For the Choux dough start by placing water, milk, and butter in a pot and place over medium heat until butter has melted. As the butter has melted turn up the heat and boil the liquid. Once the liquid is coming to a boil put the flour, sugar, and salt in as you remove the pot from the heat. Stir for your life as soon as you add the flour. Once mixed place it back on medium heat while you continue to mix and cook the flour out, dough will start to make coating on the surfaces of the pot. Pre-heat the oven to 175c. Let the dough cool for 10 minutes and add to the stand mixer. Add one egg at the time while you use the paddle attachment on medium speed. If you have a ThermoMix this dough is a breeze to make. Pipe golf ball sized balls onto a baking sheet (with Silpat). Take your Craquelin out of the freezer and use a cookie cutter and make 4cm discs. Place the discs on top to the Choux balls. Bake for 20 minutes and turn the heat down to 160c, continue to cook for 15 minutes. Cool on racks so that the bottom doesn’t get soggy. What ever you do, do not open the oven door to check on them. This will make them not puff up. You want to cook them golden, try on non dyed choux to get a feel for how they should look.

beautyandbeast-00269

Pistachio Custard

130g Pistachio (Roasted)
500g Heavy Cream
150g Sugar
250g Eggs
5g Vanilla Paste

I made this using my ThermoMix by finely grind the Pistachio into a flour/paste (any type of blender/food processor will do this). For the next step if you do not have a ThermoMix can temper your egg/cream mixture, by bringing the cream to a boil and slowly add into your eggs. Place the mixture back on the stove and gently cook until it thickens. In a ThermoMix you can place all the ingredients after the pistachios are grinded. Cook at 80c for 8 minutes on speed 5, then another 2 minutes at 90c. Place in a piping bag to cool. Pipe the choux half full with custard.

Rose White Chocolate Ganache

200g White Chocolates (Valrhona Ivoire 35%)
200g Heavy Cream
6g Dried Rose (Petals)

Add the dried rose to the heavy cream and bring it to 70c and steep the rose for 10 minutes.Bring the cream to a boil and strain the rose petals over the white chocolate. Stir the cream into the chocolate until it is all melted. Place in a piping bag to cool. Pipe the ganache to fill up the choux.

See you next time. Hungry Eyes Full Heart, Can’t Lose!

Enchanted Valentine: Snow White

The evil queen was a beautiful woman, but she was proud and arrogant, and she could not stand it if anyone might surpass her in beauty. She had a magic mirror. Every morning she stood before it, looked at her plate, and said:

Mirror, mirror, on the wall,
Who makes the tastiest dessert of all?

Our second course is a sweet one, inspired by Snow White by the Brothers Grimm.

snowwhite-00248

As long as long as the queen was not the most beautiful woman in the entire land, her envy would give her no rest. She made a poisoned apple, and from the outside it was beautiful; white with red cheeks, and anyone who saw it would want it. But anyone who might eat a little piece of it would die.

“Are you afraid of poison?” asked the old woman. “Look, I’ll cut the apple in two. You eat the red half, and I shall eat the white half.”

Now the apple had been so artfully made that only the red half was poisoned. Snow-White longed for the beautiful apple; she barely had a bite in her mouth when she fell to the ground dead.

snowwhite-00253

To make the apple, I poached a Honeycrisp in sweet white wine, and then hollowed out the core to create a shell. I froze the apples to create a lush sorbet texture, and to help the mirror glaze stick to the exterior. The mirror glaze is intended as a reference to the queen’s magic mirror. To serve the apple, I layered whipped cream and a buttery Calvados caramel on a round of puff pastry, then placed the frozen apple over the cream.
Then she summoned a huntsman and said to him, “Take Snow White out into the woods and kill her. I never want to see her again.”

The huntsman obeyed and took Snow White into the woods. He took out his hunting knife and was about to stab it into her innocent heart when she began to cry, saying, “Oh, dear huntsman, let me live. I will run into the wild woods and never come back.”

The poor child was now all alone in the great forest, and she was so afraid that she just looked at all the leaves on the trees and did not know what to do.

Joe at Measure and Stir found inspiration from the huntsman’s role in the story, and paired the apple with a drink he calls Lost in the Forest.

snowwhite-00255

The Other Half of the Poison Apple

1 Apple
100g Mirror Glaze (Red)
75g Sweet White Dessert Wine (Muscato/Sauternes)
60g Puff Pastry
20g Whipped Cream
5g Freeze Dried Apple (Powder)
10g Calvados Caramel

Start by creating your Calvados caramel. I used the recipe as my bourbon caramel, just swapped the alcohols. Peel the apples and place in a bag with the sweet wine and vacuum seal, if you have a chamber vac this will help create a compressed apple. Sous vide the apple for 30 minutes at 85c, leave to cool for a 10 minutes. Cut the apple in half and scoop out the flesh as the apple is still warm. Place the cored apples on a flat tray and put in the freezer. The Apples are served frozen to get a sorbet effect. Once the apples have frozen prepare the Mirror glaze, I made mine red. Glaze the apples and place back in the freezer.

snowwhite-00196

Prepare the puff pastry by cut them into 10cm discs, and baking it between two baking sheets. This will make sure they don’t puff up. I used store bought puff pastry, and you can get some awesome puff doughs that are ready to use. A recommendation is to get one with butter. Assemble by whipping up some heavy cream with the freeze dried apple powder. We want the cream to almost become butter. Better to go under than over on the whipping. Please the cream on the puff pastry disc and add the calvados caramel around. Cap the cream with the frozen apple.

See you next time. Hungry Eyes Full Heart, Can’t Lose!

Enchanted Valentine: The Little Mermaid

She saw the bright sun, and all around her floated hundreds of transparent beautiful beings; she could see through them the white sails of the ship, and the red clouds in the sky; their speech was melodious, but too ethereal to be heard by mortal ears, as they were also unseen by mortal eyes. The little mermaid perceived that she had a body like theirs, and that she continues to rise higher and higher out of the foam.

littlemermaid-00118

Continuing the tradition from last year, Joe from Measure and Stir and I wanted to make another set of cocktail and bites. This year we wanted to focus on fairy tales, and we selected a few of our favorite classics. We start of with The Little Mermaid by H.C. Andersen. More specific the Disney retelling of the story is what inspired this dish

In the Disney version there was a different ending, but for the cocktail we wanted to bring the original its glory. We wanted to show case both in this first course. On the plate we have Sebastian, Ariel, Ursula, and Eric. Both worlds are separated by the beach. The cocktail is a Sea Foam cocktail as all Mermaids end as sea foam. The little mermaid were gifted with a soul for all the humane suffering she endured for her love. You can read more about the cocktail here, Out of the Fathomless Deep.

littlemermaidmorewhite-00277

A World a Part

80g Wagyu Beef
50g Octopus
50g King Crab
40g Salmon
15g Sun Toasted Sand
5g Sea Foam

Sun Toasted Sand:

100g Toasted Rye Bread
100g Toasted Panko
50g Toasted Pine Nuts
30g Butter Snow
5g Dried and Toasted Wakame
5g Grated Palm Sugar
5g Sea Salt
5g Lemon Zest
2g MSG

Butter Snow:

30g Clarified Butter
10g Olive Oil
18g Tapioca Maltodextrin

littlemermaid-00124

Sea Foam:

50g Kombu
50g Bonito Flakes
200g Water
5g Sucrose Ester

First start off by making your Butter Snow by mixing the butter, oil and Tapioca Maltodextrin. The mixture should remind you of light fluffy snow. Toast up your breads and Pine Nuts to get them extra crispy. Once they are toasted combine with the Wakame and Lemon zest, coarsely grind. Balance the sand with salt and sugar.

littlemermaid-00122

For plating I cooked the Wagyu steak (Prince Eric) Sous Vide at 54c for an hour. As King Crab (Sebastian) is not in season we had to settle for frozen, which was steamed back to life, sprinkled with a little fresh chopped parsley. The Salmon (Ariel) were quickly brined in a concentrated brine. This is to firm up the flesh and make it more vibrant. The Octopus (Ursula) we got pre-cooked from Seattle’s Pike Place Market famous fish monger. They cooked the Octopus super tender, not chewy at all. Place on top of the sand and add your sea foam. Decorate with seaweed. Bring the Kombu, Bonito flakes, and water to a boil and let the mixture steep for 30 minutes. Once cooled, strain and add the sucrose ester and whip with a as much air into as you can. This ester will create light fluffy bubbles similar to a sea foam. Skim the foam off the top and place on your plate.

See you next time. Hungry Eyes Full Heart, Can’t Lose!

Deconstructed Layered Caffee Latte

Usually for New Years Eve, I get together with my friends in Norway, we make a feast and party in to the early hours of the new year. Great way to start of the year. I usually make the dessert, and this is my addition to this year’s party. I also made the other two courses of the feast for the small party of 30 guests. This dessert is inspired by the great Seattle Coffee bar’s, Slate Coffee Roasters, deconstructed latte. I find their roasting and selection of beans to lend a great addition to desserts. They usually have a lighter roast, full of aroma. You get the fruitiness and complexity of the bean and origin. If you are in the area, you should for sure check out their tasting menu. Best shared between friends or a partner, unless you are really jet lagged. This recipe makes about 6-8 small 200ml (8oz) paper coffee cups.

coffeedessert-000019
If you don’t want to serve it in a paper cup, you can always class it up a little.

Chocolate Sponge

95g Milk (Whole)
55g Vegetable oil
55g Egg white,
10g Egg yolk,
95g Sugar
55g Cake flour (Bleached)
25g Cocoa Powder (Valrhona Cocoa Powder – Roasted)
2.5g Kosher salt
2 N2O Cartridges (Cream chargers)
60g Espresso (Slate Coffee Finca San Luis)

Cut 3 small holes in the bottom of the paper coffee cup using a knife. I found it best to Combine milk, oil, and eggs to the blender and blend. Add all remaining ingredience and blend until smooth. Pour into a Whipping siphon and charge with 2 cartridges. The batter will raise a lot in the microwave. We want to create a layer that is about 3cm at the bottom of the paper cup. So we want about a little bit less than a 2cm of batter in the cups. The sponge will puff up in the microwave. Knock the cups on a level surface to make sure it is evenly dispersed. Knocking too hard will make the cakes sink together and not become airy and light. Cook in the microwave for 25-30 seconds. Pour table spoon of a freshly pulled shot of Espresso on the sponge once cooled. You can make this dessert gluten free by making this layer with the a dark chocolate cremeux. You can find a good recipe for that at my Secret Stash of Chocolate. Just swap the milk chocolate with a dark chocolate and the hazelnut liqueur with espresso.

White Chocolate Coffee Ganache

25g pour-over Coffee (Slate Coffee Kibugu Washed)
50g White Chocolate (Valrhona Ivoire 35%)

Bring the Coffee up to a boil. The coffee I used is very fruity and lends itself well to this preparation. To substitute I would recommend a light roast coffee that you like. Pour the coffee over the chocolate. Make sure you get every last drop. Stir until all the chocolate is melted. If you are not getting it fully melted, gently melt using a bain marie or microwave. Pour two table spoons of the mixture on top of the cooled sponge with espresso. This will soak into the sponge a little.

Latte Creme

50g Heavy Whipping Cream
75g Mascarpone

Mix Mascarpone with the milk until you have a smooth and no lumps. Pour two table spoons  of the mixture on top to the Coffee Ganache. Place the cup back in the freezer to set.

coffeedessert

Cold Brew Gel

200g Cold Brew Coffee (Slate Coffee All-Nighter)
1.3g Agar Agar

In a pot with the coffee add Agar Agar. Heat the coffee mixture to above 90c and make sure the Agar is stirred in well. Remove from heat. When the temperature drops to 50c, pour two table spoons of the liquid on top of the Latte Creme in the cup. Agar agar sets at 35-45c, and it sets rapidly. Place the cup in the fridge to set.

See you next time. Hungry Eyes Full Heart, Can’t Lose!

Secret Stash of Chocolate

As I have been on an Entremet kick lately I wanted to create another one, made only with the best chocolates from the deeps of my cabinet. Those that know me, know I have a chocolate shelf in my cabinet which is never touched. Just waiting to expire.And since it is Thanksgiving I wanted to hit it big. So there are 6 different textures and types of chocolate. This is a time consuming recipe, but much of the time is spent chilling layers. I used a SilikoMart Kit Lady Queen Savarin Silicone Mold. Consisting of a smaller and larger ring mold. Recipe is inspired by Savour School in Australia and their patissier competition. Kirsten have been very helpful with responding to my comments on instagram.

secretstashofchocolate-3580

Aerated Dark Chocolate Layer

150g Dark Chocolate (Valrhona Araguani 72%)
15ml Rapeseed oil (other neutral oil)

Melt and then temper the dark chocolate in a glass bowl over simmering water. I found this guide useful for this recipe. Heat the oil up to 30c and with the chocolate to a Isi cream whipper with one cream charge. Shake well. In the smallest mold in the kit, gently squirt an even layer of the chocolate mixture. Place on an even surface in the freezer to set.

White Chocolate Coffee Ganache

100g Heavy Cream
6g Coffee (Coarse Ground, Slate Coffee Kilenso Natural)
100g White Chocolate(Valrhona Ivoire 35%)

Bring the heavy cream with the coffee grounds up to a bowl, making sure the cream is not burning. The coffee I used is very fruity and lends itself well to this preparation. To substitute I would recommend a light roast coffee that you like. Prepare a  sieve with a cheese cloth. The cheese cloth will help strain the coffee grounds out, giving us a silky smooth texture. Pour the boiling hot cream into the sieve over the chocolate. Make sure you get every last drop. Stir until all the chocolate is melted. If you are not getting it fully melted, gently melt using a banmery or microwave. Just enough to melt the chocolate. Layer on top of the aerated dark chocolate layer, and place back in the freezer to set.

secretstashofchocolatelayers

Sour Cream Dulcey Chocolate Mousse

35g Egg Yolks
65g Egg Whites
75ml Heavy Cream
50ml Sour Cream
75g Dulcey Chocolate (Valrhona Dulcey 32%)

Whisk Egg whites to stiff peaks in a bowl. In another bowl whip the heavy cream and sour cream together to soft peaks. In a third bowl gently stir the egg yolks. Melt the chocolate, and once it is melted make sure it is not too warm as it will be slowly dropped into egg yolks. Whisk the egg chocolate mixture to fully incorporate making sure that you don’t scramble your eggs. Combine the cream and egg whites before very gently stiring it into the chocolate mixture. Important to take your time to keep as much air in the mixture as possible. Pour the mixture once it is fully incorporated into the mold on top of the white chocolate ganache. Place back in the freezer to set again.

Caramelia Chocolate Flourless Cake

18g Egg Yolks
18g Sugar
25g Caramelia Chocolate (Valrhona Caramelia 36%)
57g Egg Whites
18g Sugar
Flake salt (Optional)

Separate your yolks and white. Notice there is two portions of sugar, one portion for each of the egg mixes. Mix in a bowl the egg yolks with sugar until they are combined and turn white. Melt your chocolate, and slowly pour into the egg yolks. Make sure the eggs doesn’t scramble. In another bowl whisk the egg whites with the other portion of sugar until it creates firm peaks. Gently fold the egg whites into the chocolate mixture. Pour into a ring mold or make one using aluminum foil nicely folded. Lightly sprinkle some flake salt for some bursts of salt to enhance the chocolate. Bake for 13-14 minutes on 160c. Let it cool before you assemble on top of the Mousse layer. Place back in freezer to set. This finishes up the inside ring of chocolate layers.

secretstashofchocolatecremeux

Milk Chocolate Hazelnut Liqueur Cremeux

300g Heavy Cream
250g Milk Chocolate (Valrhona Jivara Lactee 40%)
60g Cocoa Butter
30g Hazelnut Liqueur
50g Egg Yolks
10g Sugar
2g Gelatin Sheets (Gold Bloom)

Heat the heavy cream on the stove, making sure not to burn the bottom. Mix together egg yolks and sugar. Temper your heavy cream into the egg mixture, 1/3 at the time. Once combined place back on the stove to heat up to 80c, then add in your hazelnut liqueur. In another bowl place your chocolate and cocoa butter and stir in the mixture and gelatin. Once the chocolate is blended smooth pour the cremeux into the larger mold. Do not place back in the freezer. Follow the assembly below.

secretstashofchocolate-3589

Assembly

Place the the inside ring of chocolate layers in the Cremeux (once it has cooled down but not set) making sure it creates an even base, you may have to fill more then you expect and then scrape off the excess. Place back a final time in the freezer to set. Prepare the glaze which you can find here (I swapped out the white chocolate for Dark Chocolate (Valrhona 66%), and black food coloring. When the glaze comes to temperature, take the whole cake out of the freezer. Place on a ring mold so the glaze can cover the entire cake. Use a sharp knife to clean up the bottom edge. Place on a cake tray and decorate. I also made some glassy hazelnuts dusted with gold and 23K edible leaf gold.

See you next time. Hungry Eyes Full Heart, Can’t Lose!

Tilslørte Bondepiker Entremet

I have long been wanting to create the latest craze of the Internet, Entremet. You may know them as the shiny cream cakes you see people post, with mirror like glaze. As it is fall season here in Seattle I wanted to take advantage of the great apples Washington has to offer. This is my take on a classic Norwegian dessert – Tilslørte Bondepiker. Traditionally it is layers of apple compote, whipped cream, and toasted breadcrumbs in butter. Inspired by Savour School in Australia I created my own Entremet staying true to the flavors of the original dessert, but also elevating it to the next level.

whatsapp-image-2016-11-13-at-21-37-59

Tilslørte Bondepiker

Apple Compote

2kg Honey Crisp Apples (Peeled and Cored)
50g Sugar
5g Malic Acid (Adjust to your level of tartness)
60ml Calvados

Cut the apples in to medium sized cubes and stew them down with sugar over medium-low heat until you get a jammy apple compote. Remove from heat and add Calvados and Malic Acid. There is going to be sweetness in other layers, so you really want to make the apple’s tartness come forward, but not a full lip-puckering tart. Allow to cool to room temperature. Using a cheese cloth, drain most of the excess water from the apples if there is any. This will ensure that you have a nice firm texture of apple. Create a 2-3mm even layer on a baking sheet and place in freezer.

Butter Biscuit

125g Butter
65g Sugar
2g Vanilla Extract
50g Egg
260g Pastry Flour
15g Milk
5g Baking Powder

Cream the butter and sugar together and add the egg, mix until well combined. Sift flour and baking powder over butter mixture. Add milk and stir until just combined. Bake at 180c for Crumble the biscuits and saute in the butter. You want the crumbs to become golden and crunchy. Create a 2-3mm even layer on a baking sheet and place in freezer. This layer can also be made as a granola to add a more rustic chew to the dessert.

Bourbon Caramel Sauce

175ml Sugar
60ml Water
240ml Heavy Cream
30ml Bourbon
10g Butter

Heat sugar and water in a pot over medium-high heat until it turns a nice amber color. Be careful as caramel goes quickly from amber to burnt if you are not paying attention. Pull pot away from the heat and add the heavy cream. Stir and put it back on to the heat but reduce the heat to medium-low. Once the caramel has thickened remove from the heat and carefully add the bourbon and butter. Stir and let cool. If you have a condiment bottle this is a practical to use for storing the caramel sauce.

Cinnamon Bourbon Custard

250g Heavy Cream
125g Whole Milk
115g Egg Yolk
50g Sugar
10g Toasted Cinnamon (ground)
5g Cinnamon (ground)
14g Gelatin (Powder)

In a pot on the stove whisk and heat all the ingredients, except for the gelatin, until it reaches about 80c. Make sure there is nothing burning on the bottom and the eggs doesn’t scramble. Stir constantly until the mixture is enough to coast the back of the spoon. Let the mixture cool to 65c and add the Gelatin while continue to whisk. Once it is cooled to room temperature place in a piping back and leave out until you are ready to pipe the molds for assembly.

whatsapp-image-2016-11-13-at-21-37-59-1

Assembly

To assemble use any mold you like. Silicon molds are awesome for this aspect and they come in many shapes and sizes. I used specifically a Silikomart ‘Stone’ mold. It creates nice curved edges and a create size for this dessert. Take your two baking sheets out of the freezer and use a cookie cutter to cut out pieces that will fit inside the mold you use. Make sure there a little room on the sides so that the layers of apple compote and biscuit crumbs before you encased in Cinnamon Custard. Easiest way I found was to pipe in the custard into the mold and take a stack of Apple Compote, Bourbon Caramel, and Butter Biscuit and gently press into the custard. Make sure they fill the mold completely and doesn’t overflow. Place back in the freezer to make them frozen solid. I used a glaze from Savour School to get that mirror shine finish. As the entremet is setting up make the glaze. It will need some time to cool to the correct pouring temperature. I split mine into two batches, so that I could create that green and red Apple look. Allow entremet to setup and defrost at room temperature before eating. I know it is hard to not eat them all, but worth the wait.

See you next time. Hungry Eyes Full Heart, Can’t Lose!

BBQ Brisket Sandwich

Today is National Sandwich day, so I found it fitting to post about my latest tasty meal I have been enjoying the past week. The Brisket Sandwich was just a vessel for my House BBQ Sauce. And trust me, it is truly amazing. Sweet, Smokey, Spicy, and a little tang. The good people over at ChefSteps have some great sous vide BBQ recipes.

brisketbbq-3495

Spanish BBQ Sauce (House Sauce)

400g Ketchup (Not too sweet)
60g Dijon Mustard (Fine)
55g Apple Cider Vinegar
45g Worcestershire
40g Chipotle Tabasco
40g Olive Oil
20g Garlic
20g Green Onion
20g Tomato Paste
5g Smoked Salt
5g MSG
5g Pepper
3.5g Cayenne Pepper
1.5g Paprika
1.5g Smoked Paprika
0.35 Ghost Chili Powder
0.1g Saffron

Combine all the ingredients in a blender and blitz until smooth. Put on to condiment bottles and get ready to use it on everything. A must for any BBQ. If you like spice, there is nothing stopping you adding a little more Ghost Chili.

For the Brisket I used a 50% Wagyu Brisket, perfectly marbled and not too aggressively trimmed. There is a great butcher/farmer that have some excellent beef if you are located in Seattle. Check out The Buther’s Table if you are in the South Lake Union (SLU) Area of Seattle. I followed ChefSteps killer Smokeless BBQ Brisket recipe, and made a cabbage and carrots using Kewpie Mayonnaise. I like thick pickles we a good crunch, so I added equal parts salt and sugar, along with Vinegar into a sous vide bag and compressed my thick cucumber slices.

See you next time. Hungry Eyes Full Heart, Can’t Lose!