Enchanted Valentine: The Little Mermaid

She saw the bright sun, and all around her floated hundreds of transparent beautiful beings; she could see through them the white sails of the ship, and the red clouds in the sky; their speech was melodious, but too ethereal to be heard by mortal ears, as they were also unseen by mortal eyes. The little mermaid perceived that she had a body like theirs, and that she continues to rise higher and higher out of the foam.

littlemermaid-00118

Continuing the tradition from last year, Joe from Measure and Stir and I wanted to make another set of cocktail and bites. This year we wanted to focus on fairy tales, and we selected a few of our favorite classics. We start of with The Little Mermaid by H.C. Andersen. More specific the Disney retelling of the story is what inspired this dish

In the Disney version there was a different ending, but for the cocktail we wanted to bring the original its glory. We wanted to show case both in this first course. On the plate we have Sebastian, Ariel, Ursula, and Eric. Both worlds are separated by the beach. The cocktail is a Sea Foam cocktail as all Mermaids end as sea foam. The little mermaid were gifted with a soul for all the humane suffering she endured for her love. You can read more about the cocktail here, Out of the Fathomless Deep.

littlemermaidmorewhite-00277

A World a Part

80g Wagyu Beef
50g Octopus
50g King Crab
40g Salmon
15g Sun Toasted Sand
5g Sea Foam

Sun Toasted Sand:

100g Toasted Rye Bread
100g Toasted Panko
50g Toasted Pine Nuts
30g Butter Snow
5g Dried and Toasted Wakame
5g Grated Palm Sugar
5g Sea Salt
5g Lemon Zest
2g MSG

Butter Snow:

30g Clarified Butter
10g Olive Oil
18g Tapioca Maltodextrin

littlemermaid-00124

Sea Foam:

50g Kombu
50g Bonito Flakes
200g Water
5g Sucrose Ester

First start off by making your Butter Snow by mixing the butter, oil and Tapioca Maltodextrin. The mixture should remind you of light fluffy snow. Toast up your breads and Pine Nuts to get them extra crispy. Once they are toasted combine with the Wakame and Lemon zest, coarsely grind. Balance the sand with salt and sugar.

littlemermaid-00122

For plating I cooked the Wagyu steak (Prince Eric) Sous Vide at 54c for an hour. As King Crab (Sebastian) is not in season we had to settle for frozen, which was steamed back to life, sprinkled with a little fresh chopped parsley. The Salmon (Ariel) were quickly brined in a concentrated brine. This is to firm up the flesh and make it more vibrant. The Octopus (Ursula) we got pre-cooked from Seattle’s Pike Place Market famous fish monger. They cooked the Octopus super tender, not chewy at all. Place on top of the sand and add your sea foam. Decorate with seaweed. Bring the Kombu, Bonito flakes, and water to a boil and let the mixture steep for 30 minutes. Once cooled, strain and add the sucrose ester and whip with a as much air into as you can. This ester will create light fluffy bubbles similar to a sea foam. Skim the foam off the top and place on your plate.

See you next time. Hungry Eyes Full Heart, Can’t Lose!

Deconstructed Layered Caffee Latte

Usually for New Years Eve, I get together with my friends in Norway, we make a feast and party in to the early hours of the new year. Great way to start of the year. I usually make the dessert, and this is my addition to this year’s party. I also made the other two courses of the feast for the small party of 30 guests. This dessert is inspired by the great Seattle Coffee bar’s, Slate Coffee Roasters, deconstructed latte. I find their roasting and selection of beans to lend a great addition to desserts. They usually have a lighter roast, full of aroma. You get the fruitiness and complexity of the bean and origin. If you are in the area, you should for sure check out their tasting menu. Best shared between friends or a partner, unless you are really jet lagged. This recipe makes about 6-8 small 200ml (8oz) paper coffee cups.

coffeedessert-000019
If you don’t want to serve it in a paper cup, you can always class it up a little.

Chocolate Sponge

95g Milk (Whole)
55g Vegetable oil
55g Egg white,
10g Egg yolk,
95g Sugar
55g Cake flour (Bleached)
25g Cocoa Powder (Valrhona Cocoa Powder – Roasted)
2.5g Kosher salt
2 N2O Cartridges (Cream chargers)
60g Espresso (Slate Coffee Finca San Luis)

Cut 3 small holes in the bottom of the paper coffee cup using a knife. I found it best to Combine milk, oil, and eggs to the blender and blend. Add all remaining ingredience and blend until smooth. Pour into a Whipping siphon and charge with 2 cartridges. The batter will raise a lot in the microwave. We want to create a layer that is about 3cm at the bottom of the paper cup. So we want about a little bit less than a 2cm of batter in the cups. The sponge will puff up in the microwave. Knock the cups on a level surface to make sure it is evenly dispersed. Knocking too hard will make the cakes sink together and not become airy and light. Cook in the microwave for 25-30 seconds. Pour table spoon of a freshly pulled shot of Espresso on the sponge once cooled. You can make this dessert gluten free by making this layer with the a dark chocolate cremeux. You can find a good recipe for that at my Secret Stash of Chocolate. Just swap the milk chocolate with a dark chocolate and the hazelnut liqueur with espresso.

White Chocolate Coffee Ganache

25g pour-over Coffee (Slate Coffee Kibugu Washed)
50g White Chocolate (Valrhona Ivoire 35%)

Bring the Coffee up to a boil. The coffee I used is very fruity and lends itself well to this preparation. To substitute I would recommend a light roast coffee that you like. Pour the coffee over the chocolate. Make sure you get every last drop. Stir until all the chocolate is melted. If you are not getting it fully melted, gently melt using a bain marie or microwave. Pour two table spoons of the mixture on top of the cooled sponge with espresso. This will soak into the sponge a little.

Latte Creme

50g Heavy Whipping Cream
75g Mascarpone

Mix Mascarpone with the milk until you have a smooth and no lumps. Pour two table spoons  of the mixture on top to the Coffee Ganache. Place the cup back in the freezer to set.

coffeedessert

Cold Brew Gel

200g Cold Brew Coffee (Slate Coffee All-Nighter)
1.3g Agar Agar

In a pot with the coffee add Agar Agar. Heat the coffee mixture to above 90c and make sure the Agar is stirred in well. Remove from heat. When the temperature drops to 50c, pour two table spoons of the liquid on top of the Latte Creme in the cup. Agar agar sets at 35-45c, and it sets rapidly. Place the cup in the fridge to set.

See you next time. Hungry Eyes Full Heart, Can’t Lose!

Secret Stash of Chocolate

As I have been on an Entremet kick lately I wanted to create another one, made only with the best chocolates from the deeps of my cabinet. Those that know me, know I have a chocolate shelf in my cabinet which is never touched. Just waiting to expire.And since it is Thanksgiving I wanted to hit it big. So there are 6 different textures and types of chocolate. This is a time consuming recipe, but much of the time is spent chilling layers. I used a SilikoMart Kit Lady Queen Savarin Silicone Mold. Consisting of a smaller and larger ring mold. Recipe is inspired by Savour School in Australia and their patissier competition. Kirsten have been very helpful with responding to my comments on instagram.

secretstashofchocolate-3580

Aerated Dark Chocolate Layer

150g Dark Chocolate (Valrhona Araguani 72%)
15ml Rapeseed oil (other neutral oil)

Melt and then temper the dark chocolate in a glass bowl over simmering water. I found this guide useful for this recipe. Heat the oil up to 30c and with the chocolate to a Isi cream whipper with one cream charge. Shake well. In the smallest mold in the kit, gently squirt an even layer of the chocolate mixture. Place on an even surface in the freezer to set.

White Chocolate Coffee Ganache

100g Heavy Cream
6g Coffee (Coarse Ground, Slate Coffee Kilenso Natural)
100g White Chocolate(Valrhona Ivoire 35%)

Bring the heavy cream with the coffee grounds up to a bowl, making sure the cream is not burning. The coffee I used is very fruity and lends itself well to this preparation. To substitute I would recommend a light roast coffee that you like. Prepare a  sieve with a cheese cloth. The cheese cloth will help strain the coffee grounds out, giving us a silky smooth texture. Pour the boiling hot cream into the sieve over the chocolate. Make sure you get every last drop. Stir until all the chocolate is melted. If you are not getting it fully melted, gently melt using a banmery or microwave. Just enough to melt the chocolate. Layer on top of the aerated dark chocolate layer, and place back in the freezer to set.

secretstashofchocolatelayers

Sour Cream Dulcey Chocolate Mousse

35g Egg Yolks
65g Egg Whites
75ml Heavy Cream
50ml Sour Cream
75g Dulcey Chocolate (Valrhona Dulcey 32%)

Whisk Egg whites to stiff peaks in a bowl. In another bowl whip the heavy cream and sour cream together to soft peaks. In a third bowl gently stir the egg yolks. Melt the chocolate, and once it is melted make sure it is not too warm as it will be slowly dropped into egg yolks. Whisk the egg chocolate mixture to fully incorporate making sure that you don’t scramble your eggs. Combine the cream and egg whites before very gently stiring it into the chocolate mixture. Important to take your time to keep as much air in the mixture as possible. Pour the mixture once it is fully incorporated into the mold on top of the white chocolate ganache. Place back in the freezer to set again.

Caramelia Chocolate Flourless Cake

18g Egg Yolks
18g Sugar
25g Caramelia Chocolate (Valrhona Caramelia 36%)
57g Egg Whites
18g Sugar
Flake salt (Optional)

Separate your yolks and white. Notice there is two portions of sugar, one portion for each of the egg mixes. Mix in a bowl the egg yolks with sugar until they are combined and turn white. Melt your chocolate, and slowly pour into the egg yolks. Make sure the eggs doesn’t scramble. In another bowl whisk the egg whites with the other portion of sugar until it creates firm peaks. Gently fold the egg whites into the chocolate mixture. Pour into a ring mold or make one using aluminum foil nicely folded. Lightly sprinkle some flake salt for some bursts of salt to enhance the chocolate. Bake for 13-14 minutes on 160c. Let it cool before you assemble on top of the Mousse layer. Place back in freezer to set. This finishes up the inside ring of chocolate layers.

secretstashofchocolatecremeux

Milk Chocolate Hazelnut Liqueur Cremeux

300g Heavy Cream
250g Milk Chocolate (Valrhona Jivara Lactee 40%)
60g Cocoa Butter
30g Hazelnut Liqueur
50g Egg Yolks
10g Sugar
2g Gelatin Sheets (Gold Bloom)

Heat the heavy cream on the stove, making sure not to burn the bottom. Mix together egg yolks and sugar. Temper your heavy cream into the egg mixture, 1/3 at the time. Once combined place back on the stove to heat up to 80c, then add in your hazelnut liqueur. In another bowl place your chocolate and cocoa butter and stir in the mixture and gelatin. Once the chocolate is blended smooth pour the cremeux into the larger mold. Do not place back in the freezer. Follow the assembly below.

secretstashofchocolate-3589

Assembly

Place the the inside ring of chocolate layers in the Cremeux (once it has cooled down but not set) making sure it creates an even base, you may have to fill more then you expect and then scrape off the excess. Place back a final time in the freezer to set. Prepare the glaze which you can find here (I swapped out the white chocolate for Dark Chocolate (Valrhona 66%), and black food coloring. When the glaze comes to temperature, take the whole cake out of the freezer. Place on a ring mold so the glaze can cover the entire cake. Use a sharp knife to clean up the bottom edge. Place on a cake tray and decorate. I also made some glassy hazelnuts dusted with gold and 23K edible leaf gold.

See you next time. Hungry Eyes Full Heart, Can’t Lose!

Tilslørte Bondepiker Entremet

I have long been wanting to create the latest craze of the Internet, Entremet. You may know them as the shiny cream cakes you see people post, with mirror like glaze. As it is fall season here in Seattle I wanted to take advantage of the great apples Washington has to offer. This is my take on a classic Norwegian dessert – Tilslørte Bondepiker. Traditionally it is layers of apple compote, whipped cream, and toasted breadcrumbs in butter. Inspired by Savour School in Australia I created my own Entremet staying true to the flavors of the original dessert, but also elevating it to the next level.

whatsapp-image-2016-11-13-at-21-37-59

Tilslørte Bondepiker

Apple Compote

2kg Honey Crisp Apples (Peeled and Cored)
50g Sugar
5g Malic Acid (Adjust to your level of tartness)
60ml Calvados

Cut the apples in to medium sized cubes and stew them down with sugar over medium-low heat until you get a jammy apple compote. Remove from heat and add Calvados and Malic Acid. There is going to be sweetness in other layers, so you really want to make the apple’s tartness come forward, but not a full lip-puckering tart. Allow to cool to room temperature. Using a cheese cloth, drain most of the excess water from the apples if there is any. This will ensure that you have a nice firm texture of apple. Create a 2-3mm even layer on a baking sheet and place in freezer.

Butter Biscuit

125g Butter
65g Sugar
2g Vanilla Extract
50g Egg
260g Pastry Flour
15g Milk
5g Baking Powder

Cream the butter and sugar together and add the egg, mix until well combined. Sift flour and baking powder over butter mixture. Add milk and stir until just combined. Bake at 180c for Crumble the biscuits and saute in the butter. You want the crumbs to become golden and crunchy. Create a 2-3mm even layer on a baking sheet and place in freezer. This layer can also be made as a granola to add a more rustic chew to the dessert.

Bourbon Caramel Sauce

175ml Sugar
60ml Water
240ml Heavy Cream
30ml Bourbon
10g Butter

Heat sugar and water in a pot over medium-high heat until it turns a nice amber color. Be careful as caramel goes quickly from amber to burnt if you are not paying attention. Pull pot away from the heat and add the heavy cream. Stir and put it back on to the heat but reduce the heat to medium-low. Once the caramel has thickened remove from the heat and carefully add the bourbon and butter. Stir and let cool. If you have a condiment bottle this is a practical to use for storing the caramel sauce.

Cinnamon Bourbon Custard

250g Heavy Cream
125g Whole Milk
115g Egg Yolk
50g Sugar
10g Toasted Cinnamon (ground)
5g Cinnamon (ground)
14g Gelatin (Powder)

In a pot on the stove whisk and heat all the ingredients, except for the gelatin, until it reaches about 80c. Make sure there is nothing burning on the bottom and the eggs doesn’t scramble. Stir constantly until the mixture is enough to coast the back of the spoon. Let the mixture cool to 65c and add the Gelatin while continue to whisk. Once it is cooled to room temperature place in a piping back and leave out until you are ready to pipe the molds for assembly.

whatsapp-image-2016-11-13-at-21-37-59-1

Assembly

To assemble use any mold you like. Silicon molds are awesome for this aspect and they come in many shapes and sizes. I used specifically a Silikomart ‘Stone’ mold. It creates nice curved edges and a create size for this dessert. Take your two baking sheets out of the freezer and use a cookie cutter to cut out pieces that will fit inside the mold you use. Make sure there a little room on the sides so that the layers of apple compote and biscuit crumbs before you encased in Cinnamon Custard. Easiest way I found was to pipe in the custard into the mold and take a stack of Apple Compote, Bourbon Caramel, and Butter Biscuit and gently press into the custard. Make sure they fill the mold completely and doesn’t overflow. Place back in the freezer to make them frozen solid. I used a glaze from Savour School to get that mirror shine finish. As the entremet is setting up make the glaze. It will need some time to cool to the correct pouring temperature. I split mine into two batches, so that I could create that green and red Apple look. Allow entremet to setup and defrost at room temperature before eating. I know it is hard to not eat them all, but worth the wait.

See you next time. Hungry Eyes Full Heart, Can’t Lose!

BBQ Brisket Sandwich

Today is National Sandwich day, so I found it fitting to post about my latest tasty meal I have been enjoying the past week. The Brisket Sandwich was just a vessel for my House BBQ Sauce. And trust me, it is truly amazing. Sweet, Smokey, Spicy, and a little tang. The good people over at ChefSteps have some great sous vide BBQ recipes.

brisketbbq-3495

Spanish BBQ Sauce (House Sauce)

400g Ketchup (Not too sweet)
60g Dijon Mustard (Fine)
55g Apple Cider Vinegar
45g Worcestershire
40g Chipotle Tabasco
40g Olive Oil
20g Garlic
20g Green Onion
20g Tomato Paste
5g Smoked Salt
5g MSG
5g Pepper
3.5g Cayenne Pepper
1.5g Paprika
1.5g Smoked Paprika
0.35 Ghost Chili Powder
0.1g Saffron

Combine all the ingredients in a blender and blitz until smooth. Put on to condiment bottles and get ready to use it on everything. A must for any BBQ. If you like spice, there is nothing stopping you adding a little more Ghost Chili.

For the Brisket I used a 50% Wagyu Brisket, perfectly marbled and not too aggressively trimmed. There is a great butcher/farmer that have some excellent beef if you are located in Seattle. Check out The Buther’s Table if you are in the South Lake Union (SLU) Area of Seattle. I followed ChefSteps killer Smokeless BBQ Brisket recipe, and made a cabbage and carrots using Kewpie Mayonnaise. I like thick pickles we a good crunch, so I added equal parts salt and sugar, along with Vinegar into a sous vide bag and compressed my thick cucumber slices.

See you next time. Hungry Eyes Full Heart, Can’t Lose!

Szechuan Pork Slider

Hello, this is Joe from Measureandstir.com, doing a guest post for Johan.

I recently made a special dinner for one of my friends visiting from out of town, and for the first course I served a slider based on my favorite Szechuan dish, eggplant with ground pork.

szechuanslider-3457

Since I was already making a significant departure from the format of this dish, I also took a lot of liberties with the individual elements. Normally, I like to deep-fry the eggplant, cook the ground pork, and then toss them in a sauce made of Shaoxing wine, soy sauce, rice vinegar, garlic, ginger, chilies, and corn starch. To that, I add sliced red bell peppers. It’s not exactly authentic, but part of the joy of cooking is to take your own liberties.

When I imagined this dish as a slider, I departed once again; I envisioned a ground pork patty, topped with slices of fried eggplant, sautéed bell pepper, and spicy mayo infused with Szechuan flavors, sitting on a mini brioche.

Let’s start with a confession: I bought the brioche from a local bakery.

For the mayo, I started with Szechuan chili oil, which is easy to make.

240 ml vegetable oil
15g Szechuan Peppercorns
20g chili flakes (I used Korean gochugaru)
1 cinnamon stick
5 star anise

Simmer the spices (except the chili flakes) in the oil for half an hour, and then strain the oil over the chili flakes. Allow the oil to rest overnight.

After making chili oil, I incorporated it into a mayonnaise.
Szechuan Mayonnaise:
2 Egg Yolks
10 ml Lemon Juice
pinch of Salt
1g Mustard Powder

Using a hand blender, slowly integrate the chili oil into the egg yolks. Once the oil is emulsified, thin the mixture with shaoxing wine until it reaches your desired viscosity. I added about 25ml to mine.

For the pork patty, I used a boneless pork shoulder, which I ground in my food processor. It is easy to grind meat in a food processor: cut the meat into 1-inch cubes and place it in the freezer for twenty minutes to get nice and firm. You can also freeze the blades and bowl of your food processor if you wish. It’s not very precise, but the colder your meat and apparatus, the coarser your grind will be. For pork, especially a stringy cut like pork shoulder, you want a grind of middling coarseness, so I only froze mine for a short time.

With beef burgers, I am a purist, and I do not like to add any other ingredients to the patty. With pork, medium rare is not an option, so I like to integrate a few extra flavors. In this case, I wanted to make sure that every element of the dish followed its theme, so I fold in a few teaspoons of XO sauce and a few cloves of minced garlic. The subtle fishiness and pungent umami flavors of XO sauce complimented the chili mayo beautifully.

For the veggies, I sliced a chinese eggplant into small disks and deep fried them for two minutes at 200C. I sliced a red bell pepper into battons and seared them in a pan until the edges blackened but the flesh was still firm. This could be done with a blowtorch.

I cooked the patty using a “smashed” style, by rolling it into a ball, placing it on a hot cast iron pan, and then smashing it with a metal spatula, exactly once, just as it was starting to heat up. The goal, as with any smashed patty, is to maximize browned surface area.

Once the patty was cooked, I let the brioche halves toast in the pan with the rendered fat from the pork patty.

To assemble the slider, I layered chili mayo on the bottom bun, followed by the patty, then the eggplant, then the bell pepper, then another small dollop of mayo, followed by thinly-sliced green onions.

See you next time. Hungry Eyes Full Heart, Can’t Lose!

Restaurant Visit: Osteria Francescana

Earlier this summer I were invited to one of my best friends wedding parties in Italy. Home of the pizza and pasta. Making sure I planned ahead I made reservations for 4 to Osteria Francescana. Osteria Francescana were originally fully booked as there some changes in how to make reservations. But the host was able to magically make a new table appear. So got very lucky to get a reservation. Just days afterwards they were given the “Best Restaurant in the World” award. So expectations were high.

img-20160913-wa0007
Got a picture with the Man himself, Chef Massimo Bottura

These are my mobile pictures I took of the meal. The meal was as you could expect top notch. But in any meal there were some I liked better than others. Attention to detail, atmosphere, and the total experience were just fantastic.


From the outside you couldn’t really tell what was behind those doors. Looks very hidden, but the best things in life are those that you explore. So this just got me more excited.

Selecting wine is not something that should be taken lightly. We started the meal with a nice Barolo 2008 and then a nice Lambrusco 2013. We selected the Tuffo menu, which is composed of the dishes you see on Netflix’s Chef’s Table. They also have another set menu, which you can find on their website.

wp_20160913_13_00_04_rich

The meal started off with a little crispy toast with Rabbit mousse

wp_20160913_13_00_40_rich

Tuile with Parmesan

wp_20160913_13_00_14_rich

Meringue shells filled with Foie Gras and Puff Pastry filled with Rabbit Pate

wp_20160913_13_10_33_rich

Tribute to Normandy
Tartar of lamb with a seafood sauce

wp_20160913_13_17_23_rich

Lentils are Better than Caviar
Lentals cooking in a briney broth to emulate the saltyness of Caviar. This was probably my favorite dish.

wp_20160913_13_29_03_rich

‘Riso Levante’
Risotto with Saffron

wp_20160913_13_36_39_rich

Mediterranean Sole
Sole served with dehydrated salt water that create a thin paper that melted away in your mouth.

wp_20160913_13_53_50_rich

An Autumn Ceviche in Modena
Mushrooms and chestnut in a cream sauce

wp_20160913_14_07_41_rich

Five Ages of Parmigiano Reggiano in Different Textures and Tempratures
Who knew you could make Parmesan sing like this. Not just you addition to pasta.

wp_20160913_14_18_33_rich

The Crunchy Part of the Lasagna
wp_20160913_14_35_32_rich

At the Dinner of Trimalchione: Fowl in the Ancient Roman Style
Fowl with crispy skin with a dark and rich sauce made with the drippings

wp_20160913_14_49_43_rich

Croccantino of Foie Gras
Foie Gras Popsicle covered with caramel chopped nuts. This was my favorite bite. But I do love my Foie Gras

wp_20160913_14_59_37_rich

Caesar Salad in Bloom
Romain Lettuce with flowers and freeze dried raspberry powder

wp_20160913_15_13_40_rich

Oops! I Dropped the Lemon Tart
Decontructed Lemon Tart, the small dots on the top of the plate were many different sauces and textures. Ranging from hot sauce and Capers, to different herbs.

wp_20160913_15_13_49_rich

Chocolate Ganache with Freeze Dried Raspberry Powder

wp_20160913_15_24_32_rich

Filled chocolate spheres with cherry liqueur, Chocolate Truffle, and Macaron with Black Truffle and Foie Gras

If you have a chance to dine at Osteria Francescana, it is something that is an adventure into the culinary marvels. The overall course and experience is something I will cherish for a very long time.

See you next time. Hungry Eyes Full Heart, Can’t Lose!

The Last Word Sundae

Hello, this is Joe from Measure and Stir, doing a guest post for johan on which we collaborated, which will also be cross-posted at my blog.

lastwordsundae-3469

This is not my first foray into the world of cocktail-inspired ice creams. My first was not up to snuff, and never made it to the web. My second was Mai Tai Soft Serve, which you may remember. Today, I am proud to share an ice cream Sundae inspired by one of my favorite classic cocktails, the Last Word. This drink is famous among cocktail enthusiasts, and as a Seattlite, it has a special place in my heart, since it was re-popularized in the modern cocktail renaissance by our very own Murray Stenson.

To make this ice cream sundae, we wanted to do something ambitious. It’s easy to get carried away when dealing with modernist techniques, and I think you will find that we did not exercise any restraint at all.

Just to review, the last word is a drink composed of equal parts:

The Last Word
3/4 oz London Dry Gin
3/4 oz Maraschino Liqueur
3/4 oz Green Chartreuse
3/4 oz Fresh Lime Juice

The green Chartreuse is really the key to this drink, as it is the source of its unique flavor. Even so, the combination and the balance are such that every element is a first class citizen. We went through several iterations before we settled upon this arrangement. What is the right way to marry an ingredient to a preparation? I confess I do not have any formal method for making these decisions.

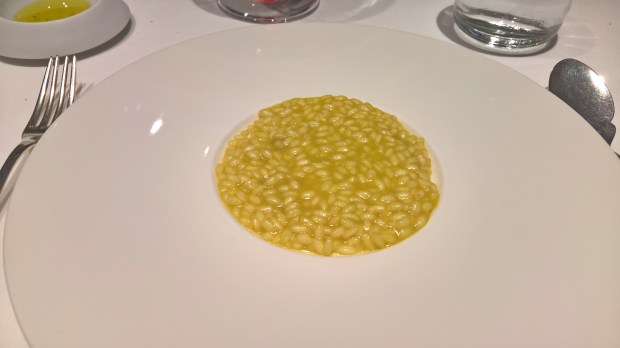
The base of an ice cream sundae is the ice cream, and for that reason, it seemed fitting to use the base spirit of the drink, which in this case is London dry gin. As I have noted before, actual spirits do not come through strongly when added to an ice cream base. We can achieve much more flavorful results by using the root flavors of the spirit, rather than the spirit itself. To make a London dry gin ice cream, we used a hint of gin, but we steeped coriander, orange peel, and juniper berries into the cream. I don’t have the exact ratio, but this will get you pretty close. Note that we use the same base recipe as in Johan’s licorice ice cream.

lastwordsundae-3467

London Dry Gin Ice Cream
650g Whole Milk
225g Sugar
200g Egg Yolks
150g Heavy Cream
50ml London Dry Gin

Before combining the ingredients to make the ice cream, infuse the milk with gin botanicals. In a pan, toast up 2 tbsp of coriander seeds and 2 tbsp of juniper berries, until the oil starts to bloom on the juniper. When the berries are shiny, drop all of the spices into the milk, and gently heat on a stovetop for fifteen minutes along with one fat orange peel, trimmed of pith.

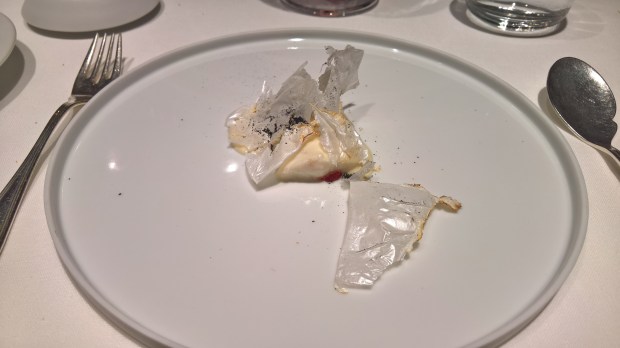
A good ice cream sundae should contain many layers and textures. Moreover, the last word, although quite spiritous, is a citrus-driven drink. It needs to the acidity and the punch of fresh sour lime juice. To achieve this end, we made a lime juice curd using this lemon curd recipe from chefsteps, subbing lemon for lime, and omitting the gelatin. I cannot stress this last point enough. In our first attempt, we used the optional gelatin suggested in the recipe, and wound up with a disgusting congealed mass.

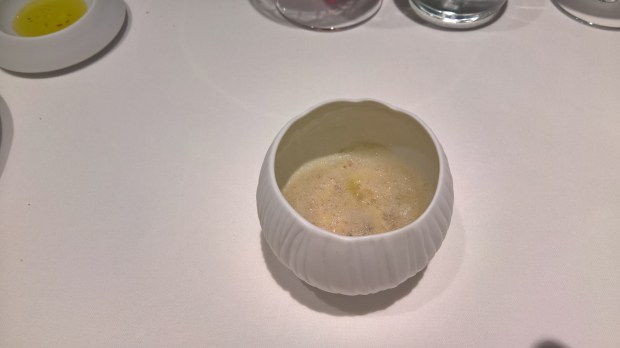
For the maraschino, we made a zabaione, which Johan called by some incomprehensible Norwegian (eggedosis) name that he will probably edit in here.

Maraschino Zabaione
3 Large Egg Yolks
100 ml Heavy Cream
Sugar and Marschino to Taste
Integrate using a mixer (or a whisk, if you want to work on those arms), and load into an iSi whipping cannister. Charge it up and shake it.

For the green chartreuse, we made a fluid gel. Modernist techniques often feel like solutions in search of a problem, but in this case, a chartreuse gel was exactly the thing. We adapted this recipe from chefsteps as well, substituting fresh orange juice with green chartreuse, and omitting the citric acid. The texture and mouthfeel was unusual, but it felt very at home in a sundae, filling in the same space where one might otherwise find chocolate fudge sauce.

At this point, we had all of the elements, and a variety of soft viscosities, but a sundae also needs crunch, contrast, and texture. To this end, we repeated some of the flavors, and expanded on others. Ice cream wants some kind of cookie or crumble, and we opted to use two.

The first was a cinnamon shortbread, which we crumbled up and used as the bottom layer. I used this recipe from Serious Eats

Cinnamon Shortbread
9 ounces (about 1 3/4 cup) all-purpose flour
8 ounces (2 sticks) unsalted butter, softened, plus a little more for greasing the pan
3 1/2 ounces (about 1/2 cup) confectioners’ sugar
1 1/2 teaspoons salt
A healthy outpouring of ground cinnamon.

Don’t overmix the cinnamon in the shortbread, in order to create a marbled effect. I don’t know how much I used, but you’ll know it’s right when you see it. Cinnamon may seem like an odd addition to the dessert, but it complements and expands on the cinnamon flavor that is present in green chartreuse. It does not repeat perfectly, but it does rhyme.

The second cookie was a tuile, which also came from Serious Eats.

Tuile
1/2 cup plus 2 tablespoons (4 1/4 ounces) sugar
1/2 cup (1 3/4 ounces) sifted cake flour
2 large egg whites
3/4 teaspoon pure vanilla extract
1/2 stick (2 ounces) unsalted butter, melted

We integrated this, allowed it to cool, then spread it into a thin layer on a silpat using an offset spatula, and baked it at 175 C until it was just brown all over, about 12 minutes. For the final plating, we just shattered it into pieces.

In addition to cookie textures, we added a couple of soft and chewy elements. The first was dried sweetened pineapple, compressed with maraschino. To make this, we bought dried sweetened pineapple chunks in bulk from a supermarket, and compressed them in a chamber vac with a shot of Botanical Gin (Uncle Val’s Botanical Gin). The longer you leave them sealed in the bag, the softer they get. We let ours sit for about two hours before draining them. They kept in a jar for quite a while afterwards, and had the texture of soft gummy candy. We chose pineapple because it pairs wonderfully with lime, and green chartreuse, but in truth, any pineapple flavor was completely eclipsed by the strong botanical Gin.

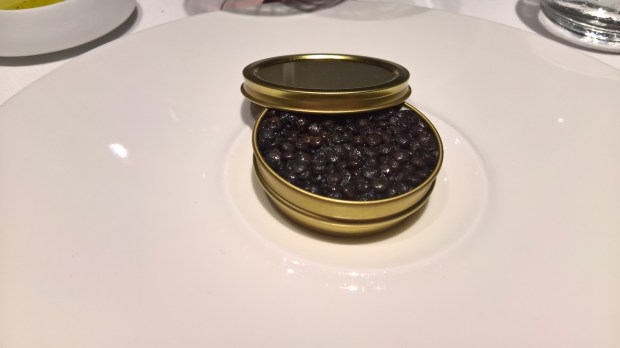
Finally, we topped it with falooda seeds soaked in a mixture of London dry gin and water. These are popular in some asian and Indian desserts, and they have the amazing property that they will soak up any liquid in which they rest. They are sometimes colloquially called frogs eggs, but they have a similar texture to modernist caviar made with sodium alginate. Since they soaked up a little gin, they were the perfect vehicle to give a tiny boozy kick to the dessert, which was otherwise lacking.

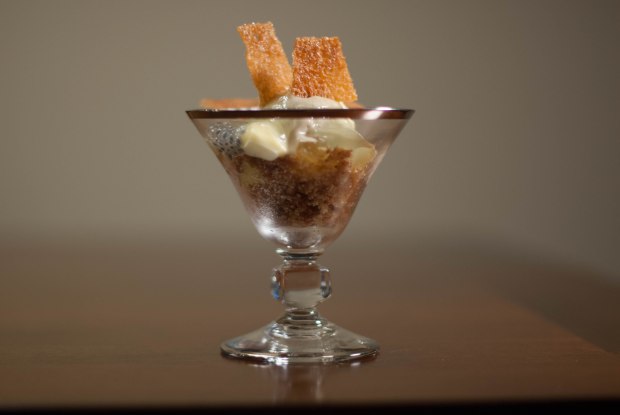
The composition of the sundae was as follows, from bottom up, served in a Cocktail Glass:

  • Cinnamon Short Bread Crumbles
  • Lime Curd
  • London Dry Gin Ice Cream
  • Citrus Gin-Compressed Pineapple
  • Maraschino Zabaione
  • Green Chartreuse Fluid Gel
  • Tuile Shards
  • Gin-Soaked Falooda

This was a lot of work, but the result was something truly special.

See you next time. Hungry Eyes Full Heart, Can’t Lose!

Bolognese Ragu & Ricotta Ravioli

Inspired by my recent trip to Italy and the Italian food capital, Modena. I wanted to create a rich Ragu using some of the fine ingredients I brought with me home, Balsamico Vinegar and Parmigiano-Reggiano. Two of the most known ingredients from the Modena area. If you make the trip to look at fast cars and taste the best food in the world, I would highly recommend stopping by Villa San Donnino for their excellent Balsamico tasting.

ravioliragu-3359

I wanted to make a hearty dish for the fall season here in Seattle. Using the best of what is available at the farmers market. For the best tomatoes you unfortunately have to find in the can section, but don’t let that fool you to think you are getting a lesser product. Keeps well in the freezer and goes well with many different types of pasta. This will be your new go to ragu.

ravioliragu-3349

Ricotta

1,8l Whole Milk
200ml Heavy Cream
120ml Vinegar (White, White Wine, Apple Cider, or White Balsamico Vinegar)
Salt

In a sauce pan heat the milk mixture with a little bit of salt. As it is heating up prepare your strainer that you line with cheese cloth. Once the mixture has reached 92c take it a side, make sure the milk does not burn on the bottom of the pan. Slowly add the vinegar (I used White Balsamico condiment) as you are stirring. After about 30 minutes strain the mixture. For the pasta dough, see my earlier post here. Create two pasta sheets and put a table spoon of ricotta in the middle about 4-5cm apart. Put the second sheet on top and make sure there is no air bubbles. Cook for 4-5 minutes in rolling salted water, or freeze for later.

ravioliragu-3354

Shortrib Bolognese Ragu

Warning, recipe is large. It keeps well in the freezer and can be used with many different types of pasta.

5 Carrots
1 Sweet Onion
6 Celery sticks
4 cloves Garlic (finely chopped)

1kg of Short ribs
1l Beef broth
250g Panchetta
50ml Balsamico Vinegar (or Balsamico condiment)
450 ml Red Wine (Sangiovese recommended)
5g fresh Sage (finely chopped)
5g fresh Rosemary (finely chopped)
5g fresh Thyme (finely chopped)
2 Bay leaves
225ml Whole Milk
225ml Heavy Cream
1l Whole peeled San Marzano Tomatoes
5-6 pieces of Sun-dried tomatoes
10g MSG
Salt and Pepper
Parmesan

In a large dutch oven sear off the Short ribs and take them out of the pot. In the same pot add the Panchetta and let that render some of the fat before adding your mirepoix (Carrot, onion, garlic, and celery finely chopped). Once your veggies have been caramelized and golden add in your red wine. I added Balsamico condiment to get another layer for richness and depth. Once the alcohol is burned off, add the stock and reduce a little. Blitz up your tomatoes with a hand blender or food processor and add that to the pot with all your spices. So this is where we are adding a little MSG. MSG is to boost the tomato flavors and get that 5th taste (Umami) really going. Don’t be affraid, it will really make this sauce go from great, to YUM. Add you Short ribs back to the pot and season with salt and pepper. Let it gently stew away for 3-4 hours, trying not to sneak a taste as the wonderful smells fill your house. Finish the sauce by adding the milk and Parmesan. Serve with al dente pasta.

See you next time. Hungry Eyes Full Heart, Can’t Lose!


Trio of Ice Cream

This summer have been a hot one, and to cool down I have been tinkering with some cold flavors. To make the ice cream I used Liquid Nitrogen (LN2), and the smallest container available for purchase at my local welder shop is 10 liters, so that creates about 3 batches of ice cream. Currently there is a trend to add Licorice to everything, so I wanted to make a ice cream with that. And to fill up the other flavors I made a Dark Chocolate ice cream. My friend, Joe from Measure and Stir, have been wanting to make a cocktail ice cream and made his take on a MaiTai. Ice cream is a dish that you can really taste great dairy, so worth the extra few dollars on the good stuff.

LicoriceIceCream
Licorice Custard Ice Cream with LN2 Frozen Raspberry and Orange shards

Licorice

650g Whole Milk
225g Sugar
200g Egg Yolks
150g Heavy Cream
10g Licorice Powder (Fine)

3 about liters of Liquid Nitrogen

Mix all ingredients together in a Thermomix. Thermomix is a food processor with a heating element built in. Meaning you can set a temperature and have have it gently stir or chop. This processes helps making an ice cream base as you need to start with a custard. Put all the ingredients in the Thermomix except for the Licorice. Licorice is a pretty dominant flavor,so less is more. You should aim for where you can taste the Licorice, but not as intense as a Licorice candy. Stir the base at 70c for about 20-30 minutes, checking every so often to make sure you have a smooth thick custard base. Once you have your custard let it rest in the fridge for at least 4 hours, but if you can leave it over night even better. You want the custard to cool down and also settle the air structure inside the base. This step is not needed, but does help create a smooth texture ice cream. Using a stand mixer whip the base at medium speed while you pour in the liquid nitrogen slowly. Once semi frozen add to a contain and let firm up in the freezer. Served with Raspberries or strawberries. A great flavor combination is Fresh Strawberries with balsamic reduction with a scoop of Licorice ice cream.

MaiTaiIceCream-2515
MaiTai Soft Serve Ice Cream with Fresh Mint and El Dorado 12yo

Mai Tai

You can read all about this cocktail ice cream over at Measure and Stir.

DoubleChocolateIceCream-2522
Double Dark Chocolate Custard Ice Cream with Milk and White Chocolate shaved on top

Double Dark Chocolate

650g Whole Milk
225g Sugar
200g Egg Yolks
150g Heavy Cream
30g Chocolate Powder (Freshly roasted)
50g 66% Caraibe (Finely chopped)
50g 72% Araguani (Finely chopped)

3 about liters of Liquid Nitrogen

I followed the same process for Licorice ice cream base for this ice cream as well.I combined the 66% Caraibe into the custard base as it was mixing in the thermomix. This melted the chocolate to infuse the flavor. Caraibe chocolate have a nutty and fruity flavor and a gentle sweetness. I wanted this to play with the roasted rich chocolate powder. Once the base is semi frozen using the liquid nitrogen, incorporate the Araguani chocolate shavings. This will add small bits of crispy chocolate and bursts of flavor. The Araguani chocolate have a bitter flavor to really complement the two other chocolates.

See you next time. Hungry Eyes Full Heart, Can’t Lose!